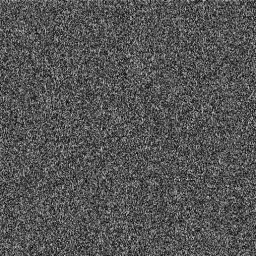
Perlin noise can be used to make some very impressive looking cloud effects, but at a substantial cost of processing power. Here is some code that I wrote after experimenting with Perlin noise. I realized that by using the texture blending characteristics of todays 3D graphics hardware, you could generate similar effects on the graphics card and move the burden away from the CPU. And what a heavy burden that is! This function utilizes a pre-made noise texture and renders it in several passes to a render surface. The render surface ends up with a texture that resembles perlin noise and it can be animated like Perlin noise (or rendered into a 3rd dimension like Perlin noise). The algorithm it turns out, is very simple and uses virtually no CPU. That's because all of the work is being done on the graphics card. Many graphics engines could benefit from creating foggy or fiery textures this way rather than on the CPU. A sample of code follows that was written in C++ with the DirectX9 SDK. The entire application that this function was extracted from can be downloaded in binary (executable) format here <HWPerlin.exe> (72KB). It will run on windows systems with DirectX9 and a 3D card installed. Run the app and press the 'N' key to toggle through the 3 render styles or ' type's. It generates a texture 512x512 pixels and animates it.
Compare that app to this one
<ClassicPerlin.exe> (56KB)
which generates a texture 256x256 pixels (stretched to 512x512) and is not as smoothly animated.
It is more taxing on the CPU.
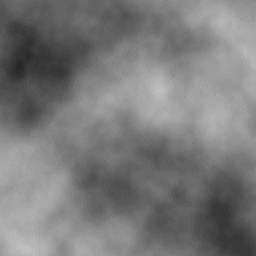
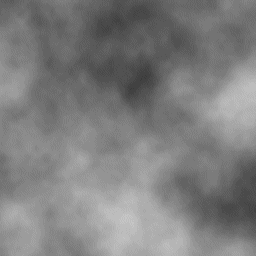
Compared with algorithms that generate Perlin noise on the CPU, this algorithm can generate higher resolution textures and animate them faster just because a CPU isn't designed to handle the kind of high volume parallel processing that a pixel processor offers. These images taken from the app at 512x512 were reduced to 256x256 for web publication:
The primary texture blending function: Notice that the perlin concepts of frequency, amplitude and persistence are applicable here. Each rendering pass doubles the frequency. The scale factor or frequency ('scf') is used as texture coordinates. Thus a frequency of two stretches a two by two grid of the base noise pattern over the target area. A frequency of four stretches a four by four pixel area, and so on. Linear interpolation is used for the magnification filter to produce a softened look. Now, this part is probably inferior to the classical algorithm which has nice quadric interpolation. I expect that future graphics hardware will support better interpolating algorithms. Each consecutive pass also adjusts 'txf' (the texture factor or amplitude) by dividing it in half. This effectively reduces the contrast (the brightness range between darkest and lightest) by fifty percent. Rendering enough passes would eventually lead to a texture factor of zero which should produce a uniform pattern of black. The rendering loop however, tests that the texture factor is larger than zero, so it will only render until no more detail is produced. In my code, dividing the texture factor by two corresponds to Perlin's persistence of 0.5. Other values could be used, but keep in mind that here 'txf' is an integer value and a factor of two works well. The only other 'trick' we use here is to calculate a shift amount ('shft') that we use to animate the texture. Each layer's texture offset is calculated a little differently to produce a slow movement for the low frequencies and faster movement for the higher frequencies. This produces a cloud-like motion. Clearly, this behaviour, as well as the way frequency and amplitude are scaled, could be altered to produce different kinds of noisy effects. Start 'scf' at a larger frequency and render in red or orange to produce a fiery look. Another way to alter the effect is to change the way the texture stages are blended together. This is done in the function above inside the 'switch' statement. Case one with the deeper contrast, in my opinion, is the better looking out of the three. It also happens to be the type of blending I used when I snapped the pictures posted above. Pressing 'N' once after initiating the program produces noise similar to those images. Any questions or comments on the code or algorithm can be directed to the address in the footer of this document. References:http://freespace.virgin.net/hugo.elias/models/m_perlin.htmThe article that got me started. The pseudo code found here is what I used to make the ClassicPerlin app which is available for download above. http://freespace.virgin.net/hugo.elias/models/m_clouds.htm Hugo Elias describes his cloud rendering algorithm in detail. Perlin noise is the basis of the technique. The section titled 'Creating Clouds' has a nice diagram that shows the way the base noise is layered and tiled, making it clear how the function posted here is operating. http://www.noisemachine.com/talk1/ A presentation from Ken Perlin himself. http://mrl.nyu.edu/~perlin/doc/oscar.html Notes about Ken's academy award and some C code for the algorithm. http://astronomy.swin.edu.au/~pbourke/texture/perlin/ Another good explanation of Perlin noise and its applications. http://www.robo-murito.net/code/perlin-noise-math-faq.html Matt Zucker discusses the mathematical complexity of the Perlin noise algorithm and the subsequent cost to process it.
|